They looked pretty impressive for how easy they were to make!
|
|
|
Our annual Halloween Party is here again! I tried to keep it similar this year and decided to make simple orange colored vanilla cupcakes with black colored chocolate frosting. I finished with chocolate webs that I made by piping warm white melting chocolate in the shape of a web on wax paper. Once cooled and hardened I placed a web each of the cupcakes.
They looked pretty impressive for how easy they were to make!
0 Comments
Our front door is ready for party guests and trick or treaters later this month! I used the black rose wreath I use every year but added some other cute additions.
I had been eyeing this Halloween doormat for months at Hobby Lobby and as soon as it went half off I bought it. I purchased the black and white buffalo rug from Amazon. Thee super cute and perfectly matched ladder sign was $5 from Walmart. The finishing touch was adding the mini pumpkins that I bought at the grocery store. Now every time I walk up to my front door a smile comes across my face! 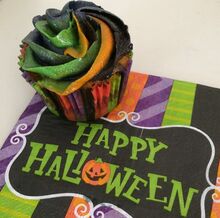 It’s Halloween time! My favorite holiday and even more my favorite party we host! This will be our ninth annual Halloween party and Andrew’s first. For this year party theme, I stuck with the classic Halloween colors: orange, black, purple and bright green. I found super cute plates at Hobby Lobby with all of these colors. They even had matching cupcake liners. To go with these fun colors I went with French vanilla cupcakes that I divided into orange, purple and green. Then using a small disher layered the three colored batters before using a toothpick to create a swirl. Once the cupcakes were baked and cooled, I frosted them using orange, purple, green, and black buttercream frosting. Actually, the black was made from chocolate frosting which gave the cupcakes a nice surprise. I placed each color in its own piping bag and then placed all floor in another piping bag with a large star tip. This created the perfect Halloween color swirl on every cupcake.
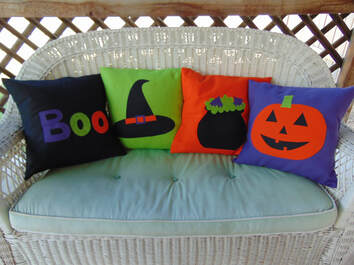 To continue my Halloween decorating insanity, I decided to make some outdoor pillow covers for the patio set. Normally, I don’t decorate the patio unless we are going to be using it as we did on the Fourth of July and since at the Halloween party, we watch Halloween movies outside. To make the pillows I bought traditional Halloween color fabric: orange, black, bright green and purple in either duct or home décor fabric. I then decided on four simple Halloween themed cut-outs to make using the other colors. After I cut out the shape I used a double-sided iron-on paper and ironed them onto the pillow. I sewed each end of the pillow fold along with sewing each of the cut-out pieces, using the corresponding thread color of course. Once the shapes were sewed on all in place I turned the cover inside out and sewed the sides together creating the fold. I was really impressed with how great they turned out and how cute they look on the patio! 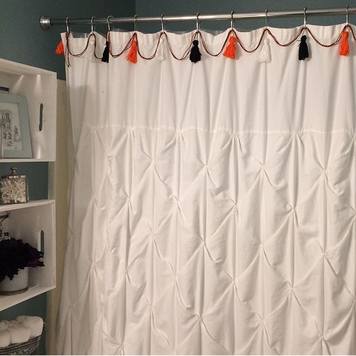 Since I wanted to decorate every room in our house for Halloween, I thought it would be fun to add garland to my shower curtain rings. I was able to find a cute ghost, bat, and Jack-o-lantern felt one for my bathroom mirror, but not one long enough for the shower curtain. I didn’t want a garland that was made out of the plastic stuff that comes off whenever you touch it either. I decided to make a simple fringe tassel one. I used embroidery floss, eight of each color: black, orange, and white to match the garland on the mirror. I put two bundles of each floss together and folded it in half and tied one end together. Next, I cut any loops and trimmed any random long strands. Lastly, I tried each tassel to a black and white rope. It was so easy to make and cost under $10 and it looks so great on the shower curtain! I might have gone overboard on decorating Halloween this year. EVERY room in our house is decorated, even our patio! To be fair our annual Halloween party is mainly in the backyard and it makes sense it would be decorated there too. I love Halloween as most of you know and this is Andrew’s first Halloween which makes me even more excited this year. I tried to make sure nothing came off as scary, but fun and colorful. From homemade pillows. to cute Target and craft store finds, to all of the stuff I already had I went a little crazy. I could give Jack Skellington a run for his money. Check out the galleries to see all of the amazing decorations and for some future post on how I made specific items! First up is our living room. Most of these decorations I have had for years and look forward to putting them out every year! Most of the decorations were bought for only a dollar each. Can't be that deal! Andrew's room might be my favorite. I love how the homemade pillows came out and look forward to reading him Halloween books while curled up under the blanket. Our bedroom looks like it can be in fancy Halloween Hotel. I love the perfect Hocus Pocus themed pillows I found on Amazon and a discount store. The blanket was made from a Halloween tablecloth I bought at Home Goods and added a flannel backing to, its perfect for a little extra warmth as the nights are getting cooler. Our Office was kept simple with just a few decorations, just enough to make me want to go in there to work! Even our bathrooms got a little decorations! I made the Halloween garland on the shower curtain to match the garland on the mirror I bought at craft store. The labels on soap and lotion bottles were Halloween beverage stickers I've had forever and fit perfectly on them! The patio was kept simple with just a few homemade outdoor pillows I made! Just enough to get comfortable and read a good book in the fall weather! I love how each room looks and every time I walk into another room it makes me smile and isn’t that the most important thing in the end? Bring on Halloween!
I love being able to use up old scraps of fabric that I have laying around. My newest thing lately is decorating the whole house for Andrew’s first Halloween which includes his bedroom. I kept is fun and colorful and nothing scary. I bought a few fun Halloween pillows at the Target bins, but I used my fabric scrap pile to make a few more. I sewed some pieces of fabric to solid fabric to create a full panel to make my classic folded pillow covers. I even sewed for squares of orange and black polka dot fabric to make a fun pillow.
All together it only took me an hour to make them and they came out so adorable. Now his room is all ready for Halloween! Happy Halloween! This is another quick and easy way to make the Witch Cupcakes that would be a perfect spooky treat for any Halloween Party! Visit here for more of my favorite recipes! 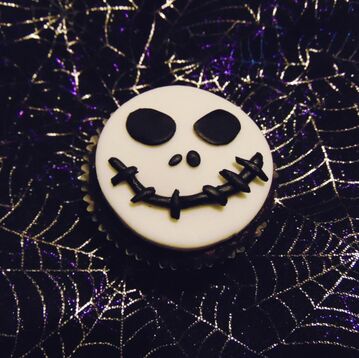 It can't be Halloween time without the Pumpkin King, Jack Skellington! These super simple cupcakes only took minutes to decorate. The chocolate cupcakes were baked in white and black striped cupcake liners and a small amount of buttercream piped on. Jack is made from rolling out white fondant and cutting out a large circle using a cookie cutter. I used a smaller circle to make his eyes. His mouth is made by rolling out a long thin rope of the black fondant then cutting them to size. The nose was done the same way, but the pieces were flattened a little. I've wanted to make these cupcakes for a while now and I can't be happier with the way they came out!  "The sky is blue, the grass is green, may we have our Halloween?” NCIS fans should recognize that line. But yes it is Halloween and for once Jack is actually home, he normally has to be at work because it is the end of his fiscal year. One of the benefits of being interim boss is that he gets to pick his trip schedule so he made home just in time for trick or treats and a movie. Since normally I am alone on Halloween night I spend it passing out candy with Amber and Aaron next door in their drive way, with Jack home we still wanted to spend it with them. I made my yummy mummy pizzas and brought over the left over candy and popcorn bar in a large tub. We also brought over the projector and watched The Great Pumpkin Charlie Brown and Poltergeist. The neighborhood kids loved watching the movie while getting their Halloween treats. We had a lot of fun and it was such a perfect evening to end the Halloween Season. Hope your Halloween was full of spooks, treats, and laughter! Happy Halloween!! This is my second Halloween costume for this year. We dressed up like Ghostbusters for our annual Halloween party and Glenda is for our work Halloween party. My whole team is going to be dressing up as the Wizard of Oz and I am really excited. I made my coworkers Dorothy ruby slippers the other day and now I am finishing up my Glenda dress. I found an old prom or bridesmaid dress at my favorite thrift store for only a few dollars and found the white with silver stars tulle at craft store. After I sized the dress to me I started adding the tulle to the pink dress. I started with the bodice, pinning the tulle in place and then going over it with the sewing machine. I then moved onto the sleeves leaving them poufy and only sewing them on the shoulder. The last think I did was the skirt. I pinned the center of the dress to the center of the tulle and pinned the sides and back. I then pinned the pleats along the skirt and sewed into place. I had the perfect Glenda costume for under $10 (dress $4, tulle $6)!!
To make the crown I used pink scrapbook paper, cutting out the shape of the crown. I then glued remaining silver star tulle to the paper crown. To hold up each point I used toothpicks on the inside and painted them pink. Lastly I added a ribbon from one side to the other so I would have a place to hold it into place with bobby-pins. To finish my look I had a silver star wand and wore my redone wedding shoes that I made into glass slippers last year when we went to see Cinderella on Broadway on our New York visit. My costume was such a huge hit and there was glitter everywhere! A few weeks ago I asked my team if they would be interested in dressing up as the Wizard of Oz movie; and much to my surprise most of the said yes. One of my team members wanted to be Dorothy and I told her that I knew how to make the ruby slippers since I have made several pair over the years. This is a really super easy process and if you’re lucky should cost you under $10, much cheaper than you could buy them for in the costume stores. Oh and an added bonus you won’t leave red glitter everywhere you walk! You’ll need: Heels Red Craft Paint Multipurpose Sealant Paint Red Round Glitter Paint Brush Paper bowl or Glass Jar To start, find a pair of comfortable shoes preferably at a thrift store. The color doesn’t really matter, but in the past I have notice a faux leather or satin works best. Paint the shoes red using regular craft paint, you can skip this step, but I have noticed that if the shoes are painted red it makes it less noticeable if you miss any glitter spots. Once the shoes are dry, mix red glitter and the multipurpose sealing in a jar or bowl. You want the thickness of peanut butter. I have learned by doing this several times with different glitter that glitter that is round shaped and not square works much better. When brushing on square glitter it tends to build up and not lay as flat. Starting at the heel, brush on thick brush fulls of the glitter mixture. Be careful not to brush spaces in the mixture. Repeat until the entire shoe is covered and set aside to dry. By the time you finish the second shoe, the first shoe should be ready for the second coat of the glitter mixture. Repeat until you have the desired look and set aside overnight to fully dry. Once dry the shoes are ready for the Yellow Brick Road!
Who’s there? Candy Gram. Every time I hear that phase I think of that famous SNL skit with Jaws. At work we wanted to update our annual Halloween Candy Gram fundraiser and I came across popcorn hands on Pinterest. I presented the new idea at our committee meeting and everyone loved the idea so we decided to do both popcorn and candy grams and call them Handy Grams. Well 410 Handy Grams later I think I switched my opinion on how cute they were! These are cute if you have to make 30, not as many as we had to make. Thankfully there were a lot of us and we were able to get them completed in a few hours. The committee heard a lot of great feedback after all of them was delivered, everyone loved them and it helped us earn a lot of money towards our Winter Warmer coming up in a few weeks!
 Halloween time means costumes and every year I get to wear a couple of different ones! For our annual Halloween party we wanted to do something comfortable and easy since it is still in the 90’s here! We decided on doing an adaptation of the classic Ghostbusters uniforms. Instead of doing full jumpsuits we wore shirts and shorts/capris, again it is in the high 90’s here! I found khaki shirts at my favorite thrift store and used some iron on transfer paper that I printed out our names and the Ghostbuster logo on. Our costumes were done in no time, but we still needed proton pack! These were going to be a little more challenging since we wanted to keep it simple and we were short on time. Instead of creating an actual proton pack we decided on doing a simplistic box version. I picked up some priority boxes from the nearby post office and printed out four copies of an oversize picture of a proton pack. I put together the four boxes leaving one flap unsealed and spray painted them white. I then followed the same process as I did with the Yosemite Picture I did several months ago, but instead of modepodge I used spray glue. I sprayed a little glue and laid the first piece of the picture in place and moved on until all four pictures were on. I then folded and glued down the sides. The day of the party we cut out a small hole where the proton pack light is and covered it with red tissue paper (on the inside) and placed a small LED light inside the pack. We cut small holes to poke the ribbon straps into, knotted them and place tape to hold them in place. Next we cut holes also into the back to put the tube of our camel packs through and finished the packs with ribbons for the straps. They came out so cool and under $12 each, the camel packs were $10. Duffey got to be our Slimmer and her costume was made with green fleece and foam cut outs. I didn’t want to be mean and make her a real costume since it was so warm so she got more of a cape. I cut out the same of the cape and added cut out eyes and mouth, and cut out a hole for her head and added elastic to hold it in place around her tummy. It looked more like Slimmer ate Duffey, but was still cute.
So who are you gonna call? For our annual Halloween Party we wanted to do something a little different. We wanted to keep it similar. A few weeks ago we purchased a project and thought it would be a lot of fun to watch Halloween movies in the backyard. We had a kid friendly movie which is one of my must watch Halloween movies: Hocus Pocus and an adult movie full of jumps and twist: The Others. I kept the food simple and fun. I made Devilish Eyeballs, Witches Fingers, Mummy Dogs, Turkey Pumpkin Chili, Brain Dip, Vampire Fang Cupcakes and Eyeball Cake Pops. Creepy and Tasty! In the backyard I had a candy and popcorn bar where you could make your own snack bags. All of the treats were a big hit and everyone loved the movies. I can’t wait to do another movie night! 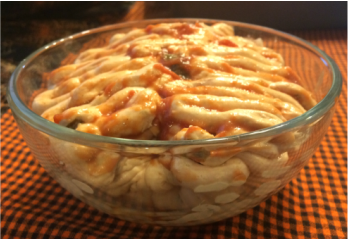 It’s time for creepy and tasty treats! Last Halloween I shared my Devilish Eyeballs and Witches fingers so this year I needed something even better! This is how you make Halloween Cream Cheese Brain Dip: Ingredients: 1 8 oz. package of soften cream cheese ½ Cup Chili Sauce* Directions: Mix the cream cheese and chili sauce together. Add a spoonful of chili sauce in the bottom of a bowl, preferable clear. Put the dip mixture in a gallon size freezer bag and cut off a small piece of one of the bottom corners. Pipe the dip in a snake design on half of the bowl, when half way up the bowl repeat on the other side. Finish piping the remaining dip in the same pattern creating the look of a brain. Top off with a little more chili sauce. Serve with crackers. This dip may look extra gross, but it is super tasty! *Can use salsa instead of chili sauce. It’s the night before October 1st and I can’t wait any longer! Time to decorate for Halloween!! Heading home from work I picked up a hot apple caramel cider and I am all set to be in full Halloween mode! With our new fireplace I had to change things up a little bit, but it came out better than ever before. I used black web lace I bought at the craft store years ago and cut along the webbing to cut in half. The other half was used for my kitchen window. I bought lots of fun pumpkins last year that I started to decorate and sadly never got to finish, but they still worked perfectly. After putting all of the cute decorations with the pumpkins, I placed a large plastic cauldron that I use every year as our candy dish in the fireplace. Looks like this witch is cooking up something fun at this house!
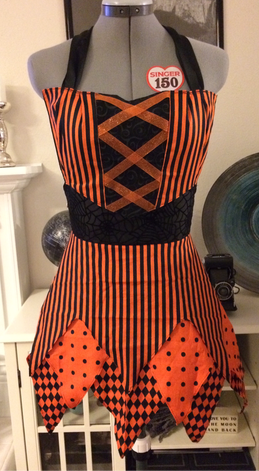 This was another apron that I have wanted to do for years and knew it was time to make it so I could enter it into the fair. I saw a similar apron at Pier-1 years ago and thought it was cute, but it I knew I could make it cuter! I decided since my favorite holiday is just around the corner that it was time to pull the fabric out of the project bin to complete. The bodice was created the same way as the Fourth of July Apron, but instead of a sweetheart neck I wanted more square. After pinning and sewing the orange ribbon in place between the bodice pieces I sewed on the web fabric belt and started working on the skirt. The skirt layers were created with a ½ a yard of each print being cut into ½ a circle. Next I used a triangle I cut out of a piece of paper to cut out the fabric. I didn’t want the triangles to directly lay on each other so it took a little maneuvering, but finally got it perfect. To be completely honest the skirt was that hardest part of this apron. It took a long time to sew all of triangles for each layer. Once all of the skirt layers were sewn, I pinned them to the belt, layering each section over another and sewed in place. The last step was to sew on the ribbon for the neck and ties. The apron was a long time in the making the finished project didn’t disappoint; it even got Honorable Mention at the fair. I can’t wait to wear it for Halloween! I had the best time last night! The Nightmare before Christmas is one of my favorite movies all time...come on its about my two favorite holidays: Halloween and Christmas! I also really LOVE Danny Elfman, the composer of the movie and almost all of Tim Burton's movies (Batman, Pee Wee's Big Adventure, Beetlejuice, Edward Scissorhands, and so on). I heard about this event for the first time last year on one of my favorite podcast and was so sad I couldn't go because the event was on Halloween night. When I heard he was doing the event twice this year I jumped at the chance to go! Thankfully I have a few friends that love his work as much as I do and was willing to dress up with me. The whole concert was mesmerizing, from the orchersta, the artwork on the screen, and Danny signing I couldn't get enough! This event does travel so if you a huge Danny Elfman and Tim Burton fan this is a must see! Costumes:
Alice - Caroline's Mom Black and White Polka Dot Dress Red Heels and Pearls Serenity - Sally Dress purchased from Hot Topic Black and White Striped Socks Black Laced Heels Me - Jack Skellington Black and White Striped Jacket from Jack's Halloween costume a few years ago Black and White Striped dress bought from Ebay (originally from Target) Bat Bow purchased from Hot Topic Black Tights Black Mary Janes 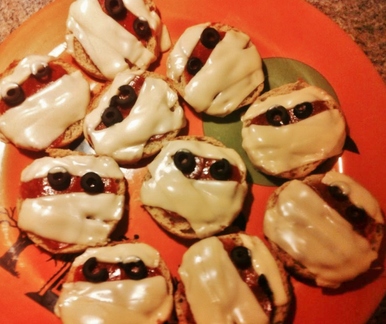 Trick-or-Treat! While we are passing out candy tonight in Amber’s drive way, we will be happily enjoying a tasty creepy dinner. The other days I shared my Mummy Meatloaf recipe and now I will be sharing our annual Halloween dinner, Mini Mummy Pizzas. Its fast, fun, and easy to eat in the middle of Trick-or-Treaters. Makes 12 Pizzas Ingredients Package of 6 English Muffins Pizza Sauce Pepperonis Sliced Black Olives Mozzarella Cheese cut into strips Instructions Preheat oven to 375. Split the English muffins and place on a baking sheet. Bake for 5 minutes or until crispy. Remove the muffins from the oven and spread a spoonful of pizza sauce on each muffin. Top with pepperonis. Cover with the strips of cheese in a mummy pattern. Use the sliced olives for the eyes. Bake for another 7 to 8 minutes or until the cheese is melted. Enjoy with a glass of Witches Punch or a bottle of Pumpkin Beer. Happy Halloween!!! 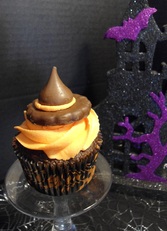 Halloween time is a time for spooky snacks and sweet treats. I love to decorate cakes and cupcakes as you may have noticed so of course I have to make something extra fun for my favorite holiday. Every year at work we have a Halloween Costume Potluck and every year I try to make something different. After playing around online I came up with a super easy idea I wanted to share, Halloween Witch Hat Cupcakes. Make and frost the cupcakes as normal, but top with this super cute witch’s hat. You’ll need a package of round chocolate covered cookies, a bag of Kisses and extra orange frosting. Lay the chocolate cookies flat on wax papered, squeeze a dollop of frosting on each cookie and top with the Kisses. Place a hat on each cupcake and you are ready to party!  Nothing is better than homemade meatloaf. This is a fun and spooky twist on a homemade classic. Serves: Makes 10 servings Prep Time 10 Minutes, Cook Time 1 hour Ingredients 2 pounds lean ground beef 2 eggs 1 chopped green bell pepper ½ chopped red onion ½ cup milk ¼ cup crumbled saltine crackers ½ 8oz canned tomato sauce 1 package Meat Loaf Seasoning Mix Salt and Pepper to taste Topping ½ 8oz canned tomato sauce ½ cup ketchup White Sliced Cheese of your choice, cut into strips Instruction Preheat oven to 375°F. Mix all ingredients in large bowl until well blended. Shape meat mixture into a mummy in a casserole dish. Top with other half of canned tomato sauce and ketchup. Cover with tin foil. Bake 45 minutes or until cooked through. Remove tin foil and cook for 15 minutes.
Remove from oven and cover with the strips of white cheese in a mummy pattern and add olives or slices of bell pepper for eyes. Cover with tin foil for 5 minutes or until cheese has slightly melted. Enjoy! Tonight is our annual Halloween Party and this year we decided to keep it simple and watch classic Horror Films. But that being said we still need some devilish movie snacks! I made Evil Monster Eyeballs and Wicked Witch Fingers.....not only are creepy, but quite tasty! Evil Monster Eyeballs 1 Dozen Hard Boiled Eggs, peeled and sliced Mustard Mayonnaise Sliced Black Olives Green and/or Red Food Coloring Chili Powder Mix egg yokes, mustard, mayonnaise, and salt and pepper to taste. Divide if using more than one food color and add a few drops of food color and mix. Use a piping bag and fill each slice egg until full. Top with a sliced black olive and sprinkle with chili powder. Wicked Witch Fingers
White String Cheese, cut into two halves Red, Yellow, and/or Green Bell Pepper Ranch Dip Open and deseed the bell peppers. Cut into 1/2 in strips, then cut into triangles for the finger nails. Next cut knuckle lines into each half of the string cheese. Cut a small flat piece at the edge of each cheese stick wide enough for the bell pepper finger nail. Fill the area with ranch dip and lastly place a bell pepper finger nail on the ranch dip. Halloween is one of my favorite times of year! I love the weather cooling off and the leaves changing colors. This year Jack and I decided to go to Halloween Disney to celebrate this favorite time of year. Halloween Disney is the only time they allow adults to be in costume at Disneyland and of course it's me so we needed costumes or it wouldn't be as much fun. I had a hard time trying to decide on what I wanted us to be, I needed to consider that we would be walking around for hours and riding rides. The costumes needed to be comfortable or both of us would of been miserable. In the end we went as Mary Poppins and Bert. We tweaked the costumes to be a little more modern and therefore a little more comfortable. See below the description on what we wore and how I made my perfectly perfect Mary Poppins hat! Bert:
Long Sleeve Blue Shirt Grey Pants Beret (newspaper boy hat), found on eBay Red Scarf, I made from a piece of red fabric Black comfortable shoes Mary Poppins: White Polo Shirt Long Navy Skirt Red bow tie, I made from red ribbon and a safety pin Black comfortable flat Mary Jane's Black straw hat with cherries and daisies To make Mary's hat, I bought a small black straw hat on eBay, some small white daisies and fake cherries from the craft store. I found a close up picture of her hat and matched the placement of the daisies and fake cherries. 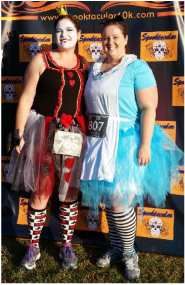 Earlier this year I attempted to run my first 5K and didn't do as well as I had hoped since a few weeks before the event I really messed up my ankle. I still had a lot of fun doing it and I still want to push myself to be able to run a 5k. However, stupidly I talked my friend into doing the 10k Spooktacular Halloween Run instead of just the 5k. In honest truth a 10k is much harder than a 5k when you are not prepared. I didn't train like I needed to and it hurt me on race day. On a more positive fun note a Halloween Run means Halloween Running Costumes! Our original idea was to be Thing 1 and Thing 2 from the Cat and the Hat, but we decided to be Alice and the Queen of Hearts from Alice in Wonderland. When we did the Super Hero run back in April we had tutus and decided we wanted to go the route again. The costumes were comfortable, easy to run in, and super fun! We got a lot of compliments at the event! Even Jack came and cheered us on as we (finally) crossed the finish line! 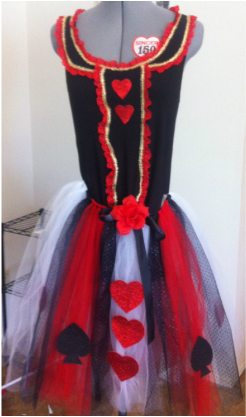 Queen of Hearts Black Tank Top Red Lace Gold Trim Red Rose 3 Yards Black Ribbon Red, White, and Black Rolls of Tulle Red and Black Glitter Foam I sewed the red lace and gold trim on the tank top to make it look more like something a queen would wear. I cut two small red hearts from the red glitter foam and sewed them on the tank top. For the tutu I alternated groups of red, white, and black tulle on a black ribbon. I sewed on larger red glitter hearts and black glitter spades onto some of the strips of tulle. Lastly I added the red rose and black bow to the front of the skirt. She found purchased the cute crown and socks. 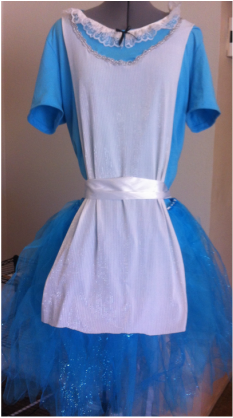 Alice Blue Cotton T-Shirt White Lace Silver Trim Thin Black Ribbon 3 Yards White Ribbon Blue Rolls of Tulle 1/2 Yard of White fabric I sewed the white lace around the neckline of my top and added a thin black bow. I cut the fabric in a simple apron shape and sewed the top of it to the t-shirt. I left the bottom unsewn so it could be easily tied into place over the tutu. I sewed a little silver trim to the top of the apron. For the tutu I simply knotted blue strips of tulle on a white ribbon. Once on I was able to tie the other white ribbon with the ribbon from the tutu to hold the bottom part of the apron in place. I bought the stripped sock and made the black bow for my hair. |
From Me...These are posts from the original Oak Tree Junction blog before I took a break in 2020. These posts were created to share my creations with the hopes that it will inspire others to show their creative side. I plan to continue to share new creations on the current blog. Categories
All
|