Follow the steps below on how I made my mask!
|
|
|
Well the CDC just announced we all should be wearing masks when we have to go out in public. Of course, all of the stores are sold out of the disposable ones and the homemade ones are surprising a little pricy. As a sewer, I knew it would be best to make our own instead of trying to purchase some. I did some research to figure out what was the safest and best fabric to use, as well as, what shape. After that was all decided I got to work. I used regular cotton fabric that I have tons of scraps leftover from other projects. Jack also donated some t-shirts he never wore to use on the inside. The two different fabrics help filter better than two of the same. I also wanted the two different fabrics to make it easier to quickly know which the outside was and which the inside was to prevent cross-contamination.
Follow the steps below on how I made my mask!
0 Comments
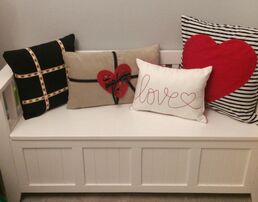 As I have done the last few holidays, I decorated every room in our house. However, I didn’t go overboard like those. I just put a few small decorations and some new pillows in all the rooms. I started by making a simple red velvet pillow for the chair in the living room, using my go-to quick fold and sew method. For a few pillows, I cut out letters or hearts and used iron-on applique and sewed in place before doing the folded method. I even purchased a few of the pillows at Target for $5 which I loved that price and how cute they were. One of the pillows said “Love you” then on the other side said, “love you more”. This is something Jack and I say all the time so I had to get it, but I wanted to be able to see both phrases. I cut the two panels apart and added light pink fabric to make the fold. The last pillow I did for Andrew’s room I used St. Valentine’s Day ribbon and tied a felt hear on it. They came out so cute and I keep adding to my holiday pillow collection! I love it! I love getting to make gifts during Christmas and this one was so cute and fun! It also was technically free to make. I had the black fuzzy fabric leftover from Halloween customs, leftover flannel fabric from baby quilts and I already had the fun ribbons. Oh and I already had the reusable plastic bag!
I cut the fuzzy fabric, the flannel fabric, and two pieces of the plastic bag into a square 10 inches by 10 inches. I then cut the ribbon in different lengths and folded them and pinned them in the place. I screwed up the first attempt at sewing this, the plastic would have been on the outside and not the flannel. I blamed it on being tired and rushing. Thankfully it was an easy fix when I reattempted it the next day. Once almost all of the four sides were sewn together, I turned it right side out and ironed it smooth, folding the unsewn part. Lastly, sewing all along the four edges to give it a clean look as well as, preventing the ribbon or fabric messing up over time. It was a really fun toy to make and I can’t wait to see if my niece likes it as much as Andy and I do! I love being able to use up old scraps of fabric that I have laying around. My newest thing lately is decorating the whole house for Andrew’s first Halloween which includes his bedroom. I kept is fun and colorful and nothing scary. I bought a few fun Halloween pillows at the Target bins, but I used my fabric scrap pile to make a few more. I sewed some pieces of fabric to solid fabric to create a full panel to make my classic folded pillow covers. I even sewed for squares of orange and black polka dot fabric to make a fun pillow.
All together it only took me an hour to make them and they came out so adorable. Now his room is all ready for Halloween! My aunt and uncle decided to have a day after Christmas family gathering because their new grandbaby was in town and wanted the family to meet him. As loyal readers know my standard baby gift is a homemade baby quilt. Even thought this was short notice I didn't want the new mom and dad feel left out. A few days before Christmas I ran to the fabric store and found some fun cowboy prints and decided on a quick and easy quilt. I cute the two cowboy prints into strips. The buckle print was cut into four inches strips and the rodeo print was cut in two 10 inch strips and one 5 inch strip. I then sewed the strips in an alternating pattern. Next I sprayed Quilt Basting spray all over the red flannel backing and laid the front on top, smoothing out the wrinkles as I went. The spray is washable and helps hold the two pieces together while during the quilting. The border was created with a four inch strip of cowprint. For a baby quilt I buy 1/2 yard for the border and cut it down in the four inch strips before sewing each piece together and ironing a double fold. This fold hides the edges and creates a clean look to the quilt. Thankfully it was a simple quilt and I had it together within a few hours. My cousin and his wife loved the baby quilt and felt honored that I took the time to make something special for their baby. I am just glad that I wasn't so stressed out with Christmas that I had the time to do something for them that they might have for a very long time.
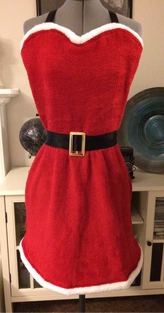 I wanted to make this super cute apron for years and I am finally that I took the time to make it! I actually made it a few months ago so I could enter it into the fair. I purchased the bright red and white towels at Target, the gold buttons and gold belt buckle at a fabric store along with the black ribbons (one five inches the other one inch). I didn't use a pattern for the red part of the apron, but cut the towel in half then cut the top into the sweetheart neckline that I wanted. Next I gathered and pinned the rectangle piece to the sweetheart piece and sewed. I cut the white towel into two 6 inch strips, long ways, and then folded in half and sewed them to the top and bottom of the red apron. I sewed the 5 inch ribbon from the center to the side only on one side then looped the gold buckle and sewed the other side of the black ribbon, securing the buckle in place. I sewed the one inch ribbon in place for the neck strap and sewed on the gold button. It was really easy to make and only took two hours; however, because the fabric was towel it was very messy, but totally worth it! I think it is really cute and look forward to wearing it this Christmas time. This is my second Halloween costume for this year. We dressed up like Ghostbusters for our annual Halloween party and Glenda is for our work Halloween party. My whole team is going to be dressing up as the Wizard of Oz and I am really excited. I made my coworkers Dorothy ruby slippers the other day and now I am finishing up my Glenda dress. I found an old prom or bridesmaid dress at my favorite thrift store for only a few dollars and found the white with silver stars tulle at craft store. After I sized the dress to me I started adding the tulle to the pink dress. I started with the bodice, pinning the tulle in place and then going over it with the sewing machine. I then moved onto the sleeves leaving them poufy and only sewing them on the shoulder. The last think I did was the skirt. I pinned the center of the dress to the center of the tulle and pinned the sides and back. I then pinned the pleats along the skirt and sewed into place. I had the perfect Glenda costume for under $10 (dress $4, tulle $6)!!
To make the crown I used pink scrapbook paper, cutting out the shape of the crown. I then glued remaining silver star tulle to the paper crown. To hold up each point I used toothpicks on the inside and painted them pink. Lastly I added a ribbon from one side to the other so I would have a place to hold it into place with bobby-pins. To finish my look I had a silver star wand and wore my redone wedding shoes that I made into glass slippers last year when we went to see Cinderella on Broadway on our New York visit. My costume was such a huge hit and there was glitter everywhere! 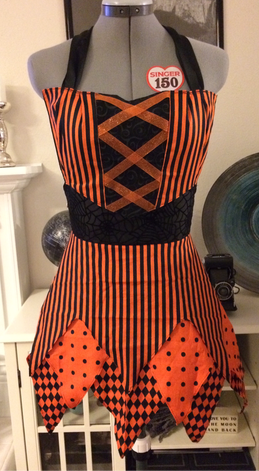 This was another apron that I have wanted to do for years and knew it was time to make it so I could enter it into the fair. I saw a similar apron at Pier-1 years ago and thought it was cute, but it I knew I could make it cuter! I decided since my favorite holiday is just around the corner that it was time to pull the fabric out of the project bin to complete. The bodice was created the same way as the Fourth of July Apron, but instead of a sweetheart neck I wanted more square. After pinning and sewing the orange ribbon in place between the bodice pieces I sewed on the web fabric belt and started working on the skirt. The skirt layers were created with a ½ a yard of each print being cut into ½ a circle. Next I used a triangle I cut out of a piece of paper to cut out the fabric. I didn’t want the triangles to directly lay on each other so it took a little maneuvering, but finally got it perfect. To be completely honest the skirt was that hardest part of this apron. It took a long time to sew all of triangles for each layer. Once all of the skirt layers were sewn, I pinned them to the belt, layering each section over another and sewed in place. The last step was to sew on the ribbon for the neck and ties. The apron was a long time in the making the finished project didn’t disappoint; it even got Honorable Mention at the fair. I can’t wait to wear it for Halloween! 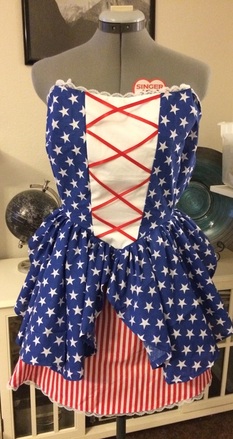 Two years ago the idea of this adorable apron came to me and I finally made it! The first year I couldn’t find the right star fabric and last year I was able to finally find the correct fabric, but didn’t have enough time to make it. I have tons of tubs full of projects that I just never got to, so lately I have been trying really hard to get to them. I decided to finally make this apron and enter it into the fair later this fall. I started by cutting out a regular shaped apron bodice and skirt. I ended up making the neck a little more sweetheart shaped to make it look more like a dress. I cut out two half circles for the skirt side panel and a white panel for the bodice. To create the bodice, I pinned the red ribbon in place and sewed the white panel to the blue pieces. I darted the sides of the bodice to give it more shape and added the white lace. For the skirt I pinned the sewed blue panels to the bodice, creating plenty of ruffles. Once all pinned I sewed on the red skirt and finishing it with white lace. Lastly I added I sewed red ribbon for the neck and the ties, making sure to melt the ends of the ribbon to prevent unraveling. The apron came out better than I thought it would two years ago! Now I am all ready for the 4th of July in my red, white, and blue! 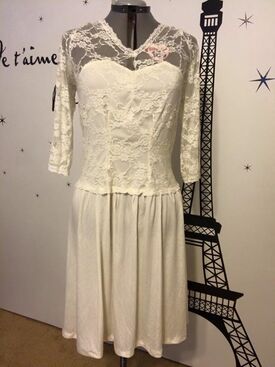 For my blessing dress I wanted something simple, yet classic. I went to every store in town and I still couldn't find anything like I was wanting. I wanted a cream dress, with lace sleeves, knee length and preferably V-neck. My vision was inspired by the wedding dress Kate Middleton work in 2011. I love how simply elegant it was and I wasn’t to find something similar. I found some online that were pretty close but was way too far out of my press range, they looked too much like a wedding dress and I wasn't something that could be also casual. After weeks of searching I gave and decided to make my own. And why not, I have made lots of costumes in the past so why couldn't I make my own blessing dress! I found the perfect cream fabric that was slightly stretchy, but wouldn't wrinkle throughout the day. I found cream rose stretchy that would work perfect for the top. I found a dress pattern that I could alter to make exactly what I was envisioning. I used the pattern pieces that I needed to make my version of the dress and started sewing. Once I was finished I was completely in love with the dress and could not have been happier that I took the risk to make it myself. This really encourages me to start making my own clothing! I paired the dress with some new blue aqua heels and my favorite pearl earrings.
Jack was a little easier, he got to wear the light grey suit that he wore during my 30th birthday and ordered him a matching blue aqua tie and pocket square. My Godmother and her husband were the witnesses and wore a black and white with black polka dress with a coral belt and shoes. Her husband had a dark grey suit and a matching coral tie. My parents and closet friends also looked great in their coordinated outfits! 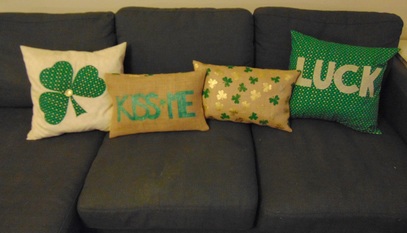 At the fabric store, I found the cutest shamrock fabric on sale and picked it up not even knowing what I was going to do with it. I didn't need another St. Patrick's Day apron or tablecloth so I decided to stick with decorating my living room and make pillows! Well actually pillow slipcovers. I decided on two different styles, two fabrics for each. I purchased 1/2 a yard of green shamrock cotton fabric and another 1/2 a yard of cream and gold cotton fabric. Lastly I purchased 1/2 a yard of fun shamrock burlap and another 1/2 a yard of plain burlap. I always keep in stock double sided iron on transfer. I measured the two cotton fabric to the 10 x 10 pillows I was going to use, leaving lots of room to overlap the fabric and room for sewing. I folded the two outer edges twice and sewed a straight line. I then centered the pillow on the fabric and folded the two sides overlapping and marked the center of the fabric. After deciding on what I want the cotton pillows to look like I cut out the letters/hearts on the transfer paper (if doing letters you will need to reverse the letters!). I put the inverted letters and hearts on the opposite cotton fabric and ironed until the glue stuck. I carefully cut out the letters/hearts and centered them on the pillow fabric and ironed in place. Once the glue cooled I sewed the letters/hearts in place. The last step I overlapped and sewed the two outer edges. For the shamrock pillow I added a gold button in the center. Super cute and super comfy! I followed the same process of sewing the longer and narrower burlap pillows, but instead of ironing on fabric I decided to paint on one of the pillows. I used regular chalk and marked out the letters, then went back with a black permanent marker and outline each letter. The last thing was to heavily paint in the letters using metallic green paint. Once the paint was dried I followed the sewing steps above.
I have shown you a few quilts I have done in the past; a wedding guest quilt and a bridesmaid dress quilt. These are two simple easy baby quilts I did for two baby showers. These simple and adorable baby quilts are my traditional baby shower gift. For a basic square quilt I suggest anywhere from 8 to 15 different cotton fabric, depending on the pattern 1/4 to 1/2 yard for each. You will also need 1 1/2 yards of cotton fabric for the back of the quilt, I suggest a flannel fabric. Lastly you will need 1/2 a yard of cotton fabric for the trim. Cut out all of the quilt fabric into squares and decided on your pattern. I like to lay all of the squares on the ground in the desired pattern until I am ready to sew. I start with sewing a small row at a time, 1/4 inch seam. After two rows are completed, I align the seams together and pin in place. You can skip this step, but I don't recommend it because if your squares don't line up correctly it can ruin the symmetrical look of the quilt. Once all of the rows are sewn together I use a quilt binding spray to help keep the front piece to the back piece. Sew the two pieces together in the desired pattern; rows along the seams, diagonal, or random. If you don't want to sew them together you can use a needle and a very thin ribbon to knot the pieces together. I have also in the past sewn buttons to hold together. Once the two pieces are attached sew on the trim. There are several steps to making a quilt and can be broken down to a step a day, but in a rush you can easily accomplish your very own baby quilt in just a few hours! I hope if you have a baby shower coming up you skip the registry and make a special and personizled baby gift. I promise you the mom-to-be will be mood by your precious keep sake!
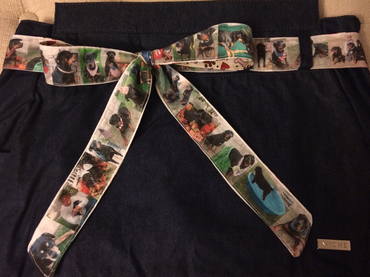 Christmas time is here and that means it’s time for Christmas gifts. I know when it comes to the perfect gift to my mom I just need to do something that involves her dogs! I decided to make her a special shash for her Prima Miche bag. I am a Miche representative and all of the ladies in my family carry these great bags so I have made my own sashes for certain shells. I picked 30 favorite pictures of all her dogs and printed them on fabric paper that I found at the local craft store. I simply created the print out in Word and made them about two inches height and closely next to each other. I cut the rows of pictures in small strips and sewed them all together to create a long ribbon. I then sewed on a cute dog print fabric to the other side of the picture ribbon. Lastly I ironed the sash and put it on a new Prima shell. I have no doubt that she is going to love her personalized gift. I hope you take the time to make a unique gift this Christmas for someone special. A few weeks ago one of my cousins asked if I would make her sister a special Christmas gift. She wanted to use her old bridesmaid dress from her sister's wedding to make a baby quilt for her expecting sister. I was really happy to help make such a special gift. We picked out fabrics that would go with the theme of the nursery and the bright pink bridesmaid dress: 8 cotton prints, 1 satin print to go along with the pink dress, 1 print for the trim and a soft flannel print for the back. I cut the 8 cotton prints, the satin fabric, and the fabric inside of the dress into 4 x 4 squares using a rotary cutter, 4 inch width cutting ruler and a cutting mat. I laid the squares on the floor until I worked out the pattern. I wanted the bright pink from the bridesmaid dress to be the focal point of the quilt so I used it the most. I sewed each row of squares into a single row. Once I had two rows sewn, I pinned the two together matching each corner and seamed together. Once all of the rows were together I sewn on the flower detail from the dress to the center of the quilt. I then measured the back flannel fabric and cut it to fit the front piece. I then used quilt washable spray to get the two piece to stay together as I seamed them together. I didn't need to use a quilt batting since I was using flannel and didn't want the quilt to be too heavy. I sewed the two pieces together by doing a simile line pattern that followed the seams of the squares. For the trim I cut the fabric into long strips of 4 inch width and sewed all of the pieces together. I then ironed the strips in half, then ironed the edges into the middle seam. I basically made my own bias tape. I pinned the trim in place and sewed together. This was a fun and sweet idea for such a personal and memorable Christmas gift. I hope she likes it!
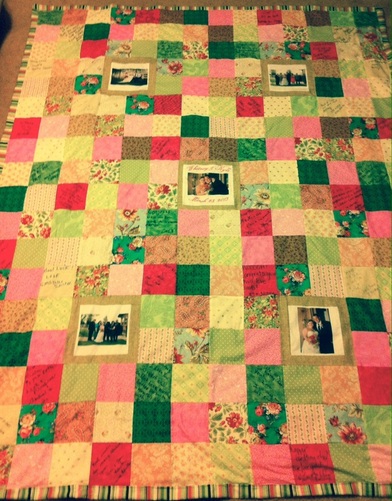 This quilt was a year and a half in the making. In March of last year, my cousins asked me if I would be willing to sew her a wedding guest book quilt. I happily agreed and we went out to buy the fabric we needed. I cut out all the fabric in 5" x 5" squares and for the signatures I suggest using a none print fabric with a permanent fabric marker. The wedding came and went and a year later we realize that we never finished working on the quilt. During my birthday party in June, we started talking about it again and I asked if she would care if I entered it into the fair. She agreed and I now knew I had a deadline! In August we finally got together and planned the layout of the quilt and picked out the pictures she wanted to add to the quilt. I used a direct print on cotton fabric product that I purchased at Joann's for the pictures since I knew I didn't want to use a print and iron on product. I've used them in the past but I find them to me more work. With the direct print fabric I was able to center the picture in a Word document, printed it, then cut the fabric to the size square I wanted. It took about a week to sew everything together and that was working on it only a few hours a night. I love how the fun fabrics work so well together, and hopefully so will the fair judges! Update: I received Second Place in the Memory Quilt Division!! 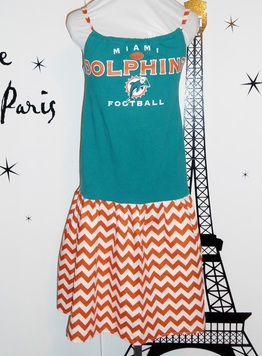 Well today was the official kick off of football season! As with any good sports fan, we like to show support by wearing our team's colors. The photo on the left is the dress I made for Amber's birthday gift earlier this year. It is made from an old tshirt I bought on eBay and some fun orange and white chevron fabric. Follow the steps below for your own perfect and unique game dress! Materials: Sports Team Shirt 1 Yard fabric Instructions: Cut the collar and sleeves off of the t-shirt. Cut the fabric for the skirt by tracing a skirt or dress with a similar shape. Make sure to allow ½ inches for the seams. When cutting the skirt it will be easier if the bottom of the t-shirt is the same width as the top of the skirt fabric. Next, sew the side seams of the skirt. Pin the top of the skirt to the bottom of the t-shirt and sew together. Hem the bottom of the skirt to the desired length. Lastly, fold and sew the top neckline of the top (front and back), pin if necessary to leave a small gab. Feed ribbon or hemmed fabric through the opening and sew or tie together. Additional notes: If desired add a ribbon around the waist. I also didn't need to add elastic to the dress but depending on your fit you may need to use some. I completed Amber’s dress in under two hours. |
From Me...These are posts from the original Oak Tree Junction blog before I took a break in 2020. These posts were created to share my creations with the hopes that it will inspire others to show their creative side. I plan to continue to share new creations on the current blog. Categories
All
|