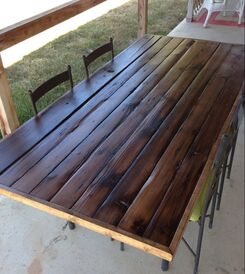
| Front side of the barn door | Back side of the barn door |
|
|
 This has been a project I have wanted to do for about five years now, ever since my grandmother passed away. I used to love playing in the big old red barn growing up that was at the very back of her property. Last spring I finally convinced Jack to go with me to help pick out some of the old barn boards. Not only did we come home with lots of the unpainted boards from the inside, but we actually took the barn door! Literally. Technically there was only one door left and the barn looked bad with only the one and I quickly realized that it was the perfect size for a table, so we took it. And then it sat in the garage for the last year. Since the weather has been so nice and we finished the garden gate and currently waiting on the next project, I decided it was the perfect time to make our new table.
I started by using a heavy-duty paint stripper to get off as much of the weathered damage on the front so it would better adhere to the new backing. I stained the plywood before attaching it to the barn door to prevent the newer wood showing through. We then used Liquid Nail and some screws to attach the former face of the barn door to the stained plywood. I wanted to make sure the table was going to be sturdy and not flex. Also by doing this first made the other side of the door much easier to sand. Once the glue dried overnight we cut the door/plywood to the size we wanted. Then I sanded the new tabletop, a lot. I started with 220 grit sandpaper and then went to 150 grit. I repeated this process several times until I could rub my hand across it without getting splinters. We bought 2 x 1 boards and used them as trim around the original barn door. This framed it out nicely, as well as, hid the sides of the plywood. Next we attached the new tabletop to an old outdoor table stand we had. The new boards were to new looking and the sanded down the door was lighter after being sanded down so I decided to do a quick light stain of special walnut before sealing it with a clear coat. I used an outdoor varnish and put three thick coats of the sealant, letting it dry fully between each coat. The finished table turned out better than I ever imagined! It’s such a great way to turn something so memorable from my childhood to something I will see and use all of the time!
0 Comments
Your comment will be posted after it is approved.
Leave a Reply. |
From Me...These are posts from the original Oak Tree Junction blog before I took a break in 2020. These posts were created to share my creations with the hopes that it will inspire others to show their creative side. I plan to continue to share new creations on the current blog. Categories
All
|